40 min read

Elementor Pro Plugin has become an effective tool for WordPress users looking to improve the functionality and appearance of their website in the constantly changing field of website design and development. It’s an ideal time to explore the process of installing and setting up Elementor Pro plugin on your WordPress site.
Introduction
Staying ahead of the curve is not just a wish, it’s a need in the ever-changing world of WordPress website design. Elementor Pro can help with it. We’ll explain How to Install and Set up Elementor Pro in detail and demonstrate how to use it on your WordPress site in 2023 in this detailed guide. You may improve your online design and development skills with the help of Elementor Pro, which is more than simply another plugin.
It’s critical to make sure that your website remains current in 2023, as WordPress continues to develop and adapt to the most recent technology and trends in web design. This objective may be accomplished with the help of Elementor Pro. It gives WordPress users the ability to easily construct gorgeous, responsive, and highly configurable websites because of its exceptional features and functions.
The straightforward but crucial purpose of this guide is to provide you with a step-by-step, hands-on tutorial for installing and configuring the Elementor Pro Plugin. This guide offers everything you need, whether you’re a beginner trying to learn more about WordPress or an experienced developer interested in exploring the newest enhancements and capabilities of Elementor Pro Plugin in 2023. By the time you finish this journey, you’ll not only have Elementor Pro installed and operational on your website, but you’ll also have a firm grasp of how to maximize its functionalities, ensuring that your website stands out in the competitive digital environment of 2023. In order to fully use Elementor Pro, let’s get started right now.
Pre-installation Preparation
Welcome to the ultimate guide on How to Install and set up Elementor Pro on your WordPress site in 2023. If you’re looking to take your website design to the next level, You’re in the right place! Before we dive into the exciting world of Elementor Pro, it’s crucial to ensure that you are well-prepared for a smooth installation and setup process.
You can prepare a checklist as follows to organize the installation and setup process:
Checklist
- Active WordPress website.
- Elementor has a free version installed (we’ll guide you if you don’t have it).
- Confirmed compatibility between your WordPress version and Elementor Pro.
- A recent backup of your WordPress site (we’ll show you how to create one).
Prerequisites for Installing Elementor Pro Plugin according to above Checklist
Ensure you have everything you need before we start the installation process:
- Active WordPress Site: You need to have a live WordPress website in order to install Elementor Pro plugin. Make sure to set up your WordPress site if you haven’t already before continuing.
- Elementor Free Version: Elementor Pro is an extension of the free Elementor plugin. Just check that the free version of Elementor is already installed on your computer. If not, don’t worry; we will guide you through it.
Check WordPress Compatibility
The first step in your journey to mastering the Elementor Pro plugin is to check the compatibility of your WordPress version. Elementor Pro is a dynamic plugin that may have specific requirements when it comes to WordPress versions. Ensuring compatibility is essential to avoid any potential issues during installation and usage.
How to Check WordPress Compatibility:
- Step 1: Log in to your WordPress admin dashboard.
- Step 2: In the left sidebar, hover over “Dashboard” or click “Home” to access the dashboard overview. Your current WordPress version will be displayed here.
- Step 3: Visit the official Elementor Pro website or consult their documentation for the latest compatibility information. They often provide details about which versions of WordPress are supported.
- Step 4: Ensure that your current WordPress version falls within the supported range mentioned by Elementor Pro.
Backup of Your WordPress Site
Your website is a precious asset; therefore, you should proceed with proper care when making changes, particularly significant ones like installing a paid plugin such as Elementor Pro. Backing up your WordPress site is what we will do initially.
Backups are a kind of website insurance. They act as a backup plan in the event that anything goes wrong during the installation or setup of Elementor Pro. If something unexpected happens, you’ll be grateful that you have a backup option.
Why Backups Matter:
- They act as a safety net in case anything goes wrong during the installation process or while setting up Elementor Pro.
- They prevent data loss and allow you to restore your site to its previous state if needed.
How to Create a Backup
If you’re not sure how to create a backup of your WordPress site, don’t worry, we are ready to help backingup of your WordPress website. Let’s create a backup.
Creating a backup of your WordPress website is crucial to ensure you can recover your site in case of data loss, hacking, or other unforeseen issues. Here’s a step-by-step process on how to create a backup of a WordPress website:
Method 1: Using a WordPress Backup Plugin
Install a Backup Plugin:
- Log in to your WordPress admin dashboard.
- Navigate to the “Plugins” section on the left sidebar.
- Click “Add New.”
- Search for a reputable and popular backup plugin such as “UpdraftPlus,” “BackupBuddy,” “VaultPress” or “All-in-One WP Migration.”
- Install and activate the chosen backup plugin.
Configure the Plugin:
- After activation, you’ll typically find the plugin’s settings in the WordPress dashboard menu.
- Follow the plugin’s setup wizard or configuration steps.
- Configure backup settings, including how often you want backups, where to store them (cloud, server, or both), and what files and databases to include.
Initiate a Backup:
- Once you’ve configured the settings, initiate a backup manually or schedule automatic backups.
- Most plugins offer a “Backup Now” or “Start Backup” button. Click it to begin the backup process.
- Depending on your website’s size, this may take some time.
Store Backups Securely:
- Ensure that your backups are stored securely, either in the cloud (e.g., Dropbox, Google Drive) or on a remote server.
- Some plugins also allow you to download backups to your local computer for an additional layer of security.
Method 2: Manual Backup
If you prefer not to use a plugin or want to supplement your automated backups with manual backups, you can follow this method:
Access Your Hosting Control Panel:
- Log in to your hosting account’s control panel (e.g., cPanel, Plesk).
Access File Manager:
- Locate and open the “File Manager” or a similar option in your hosting control panel.
Navigate to Your WordPress Directory:
- Inside File Manager, navigate to the root directory of your WordPress website. This is typically in the “public_html” folder or a subdirectory if you’ve installed WordPress in a subfolder.
Select All Files:
- Select all the files and folders in your WordPress directory. You can usually do this by clicking the checkbox at the top or selecting all files and folders individually.
Compress the Files:
- After selecting all files, look for an option to compress or zip them. This option is often available in the control panel, usually labeled as “Compress” or “Zip.”
Download the Backup:
- Once the files are compressed into a zip archive, right-click on the archive and select “Download” to save it to your local computer.
Backup the Database:
- To back up your WordPress database, you can use phpMyAdmin or a similar database management tool provided by your hosting provider.
- Export your database as a SQL file and save it to your local computer.
Store Backups Securely:
- Like automated backups, ensure that your manual backups are stored securely, either in the cloud, on a remote server, or on your local computer.
Remember to regularly update your backups, especially after making significant changes to your website. Having a reliable backup strategy is essential for WordPress site maintenance and security.
Now that we’ve covered the prerequisites and emphasized the importance of website backups, let’s proceed with the step-by-step process of installing and setting up Elementor Pro. Whether you’re a WordPress beginner or an experienced user, this guide will provide you with the knowledge and confidence to enhance your website with Elementor Pro’s powerful features.
Let’s get started on this exciting journey of elevating your WordPress website’s design and functionality!
Purchasing Elementor Pro Plugin
Elementor Pro is not just another WordPress plugin; it’s a game-changer for web designers and site owners. It offers a drag-and-drop interface, advanced widgets, and templates that can save you hours of design work. With Elementor Pro, you will have the power to create visually stunning, responsive websites with ease.
Now that you understand the significance and benefits of Elementor Pro and why it’s a game-changer for WordPress website development, the next step is to purchase it.
It is very easy to purchase Elementor Pro from their official website.
Step-by-Step Guide on How to Purchase Elementor Pro Plugin:
- Step 1: Visit the official Elementor Pro website.
- Step 2: Explore the various subscription plans (Essential, Expert, and Agency) to find the one that suits your needs.
- Step 3: Click on the plan you prefer and then click “Get Started.”
- Step 4: Fill in your personal and payment information.
- Step 5: Review your order and click “Purchase Now” to complete the transaction.

Different Subscription Options
- Essential Plan: Ideal for single-site owners or bloggers. 1 Pro Website.
- Expert Plan: Suited for small businesses managing multiple websites. 25 Pro Websites.
- Agency Plan: Designed for web design agencies and developers handling client sites. 1000 Pro Websites.
Choose the plan that aligns with your requirements. Remember, Elementor Pro frequently updates its plans and features, so make sure to check for any special promotions or discounts when you make your purchase in 2023.
Purchasing Elementor Pro plugin is a fundamental step in the journey towards elevating your WordPress website’s design and functionality. Once you’ve secured your copy, we’ll proceed with the installation and setup, which we’ll cover in detail in the upcoming sections of this guide.
Downloading Elementor Pro Plugin
With Elementor Pro purchased, the next step is to download the plugin files to your computer. Follow these steps to get your hands on Elementor Pro:
Accessing the Elementor Pro Download:
- Step 1: Visit the Elementor website (https://elementor.com/) if you’re not already there after making your purchase.
- Step 2: Log in to your Elementor account. Use the credentials you created during the purchase process.
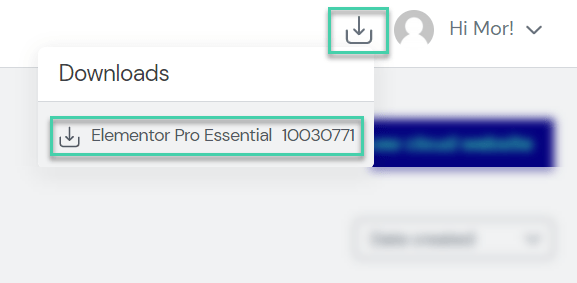
- Step 3: Once logged in, navigate to your account dashboard. Look for a section or tab that says “Downloads” or something similar. This is where you’ll find the Elementor Pro files.
Saving the Elementor Pro Zip File to Your Computer:
- Step 1: In the “Downloads” section, locate the Elementor Pro plugin file corresponding to your purchase.
- Step 2: Click on the download link or button associated with that file. It should prompt your computer to save the file, usually in the “Downloads” folder by default.
- Step 3: Wait for the download to complete. The time it takes depends on your internet speed.
- Step 4: Once the download is finished, you’ll have a zip file containing Elementor Pro ready on your computer.
Verify the Downloaded File (Optional):
- For security reasons, it’s a good practice to verify the downloaded file’s integrity, ensuring it hasn’t been corrupted during the download process.
- Most operating systems provide options to verify file checksums. Refer to your OS documentation for instructions on how to do this.
Now that you’ve successfully downloaded Elementor Pro to your computer, we’re one step closer to bringing its powerful features to your WordPress website. In the following sections, we’ll guide you through the process of installing and activating Elementor Pro on your WordPress site, making your website design experience a breeze.
Installing Elementor Pro Plugin
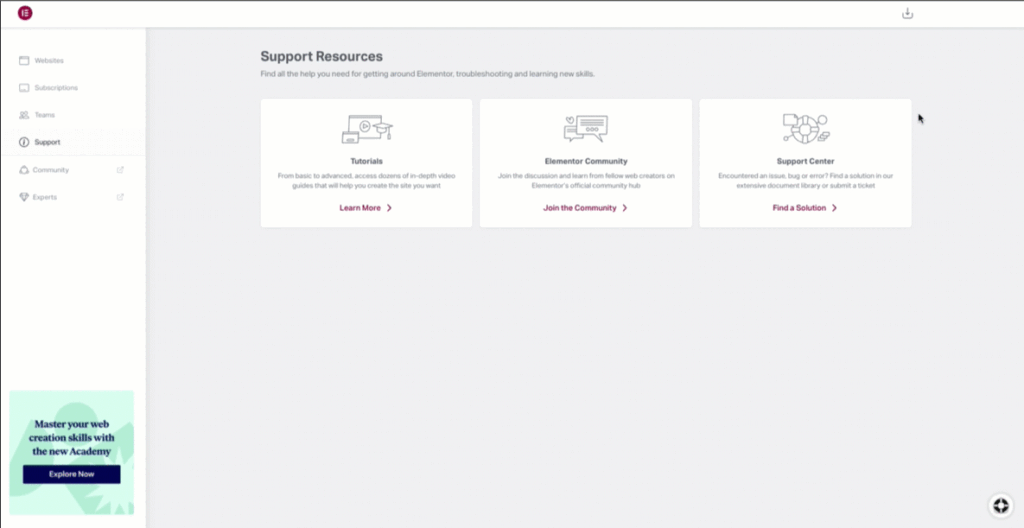
Now that you have the Elementor Pro plugin files downloaded to your computer, it’s time to install this powerful tool on your WordPress site. Follow these straightforward steps to get Elementor Pro up and running:
Logging into Your WordPress Dashboard:
- Begin by logging into your WordPress admin dashboard. You can do this by navigating to your website’s URL and adding “/wp-admin” to the end (e.g., “https://yourwebsite.com/wp-admin”).
- Enter your WordPress admin username and password to access the dashboard.
Navigating to the Plugins Section:
- Once you’re in the WordPress dashboard, look for the “Plugins” menu item on the left-hand sidebar. Hover over it, and you’ll see a submenu.
- Click on “Add New” from the submenu. This will take you to the plugin installation page.
Uploading and Activating Elementor Pro Plugin:
- On the “Add Plugins” page, you’ll see an “Upload Plugin” button at the top. Click on it.
- A file upload form will appear. Click the “Choose File” button, then browse and select the Elementor Pro zip file you downloaded in the previous section.
- After selecting the file, click the “Install Now” button to begin the installation process.
- WordPress will now upload and install the Elementor Pro plugin. Once done, you’ll see a success message, and an “Activate Plugin” button will appear. Click on it to activate Elementor Pro.
By following these steps, you’ve now installed and activated Elementor Pro plugin on your site. Next step is to activate Elementor Pro with entering license key.
Activating Elementor Pro Plugin
Now that you’ve successfully installed and activated Elementor Pro plugin, the next crucial step is activating it on your WordPress site with license key. Activation allows you to access all the premium features and benefits that Elementor Pro has to offer. Follow these steps to activate Elementor Pro Plugin:
Entering Your License Key:
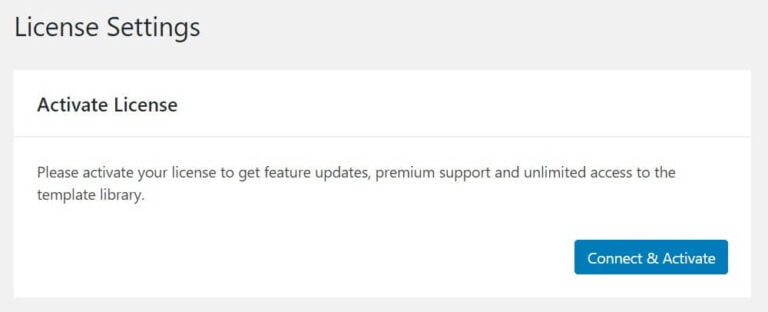
- Upon activation, you’ll be prompted to enter your Elementor Pro license key. Locate the license key you received when purchasing Elementor Pro and enter it in the provided field.
- Click the “Activate” button, and Elementor Pro will verify your license.
- Congratulations! You’ve now successfully installed and activated Elementor Pro on your WordPress site.
Activating the License:
- Lastly, it’s time to activate your Elementor Pro Plugin license. This step is essential to verify that you’re using a legitimate copy of the plugin.
- In the Elementor settings, navigate to the license activation section.
- Enter your Elementor Pro license key once again. This is usually a one-time setup, and you won’t need to do it every time you update Elementor Pro plugin.
- Click the “Activate” button, and you’ll receive a confirmation message indicating that your license has been successfully activated.
Configuring Elementor Settings:
- After you’ve activated Elementor Pro Plugin, you’ll likely be redirected to the Elementor settings page. If not, you can access it by clicking on “Elementor” in the WordPress dashboard.
- In the settings, you’ll find various options to customize Elementor’s behavior. Take a moment to review these settings and configure them according to your preferences. This step is optional but can be beneficial for fine-tuning Elementor Pro to your specific needs.
Connecting Elementor Pro to Your Elementor Account:
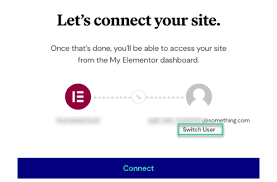
- To ensure that Elementor Pro receives timely updates and support, you’ll need to connect it to your Elementor account.
- In the Elementor settings, look for an option to connect your account. It may be labeled as “Connect,” “Activate,” or something similar.
- Click on this option, and you’ll be prompted to enter your Elementor account credentials. Use the same email and password you used during the purchase of Elementor Pro.
- Once you’ve successfully connected your account, Elementor Pro will be linked to your Elementor subscription, enabling seamless updates and access to support.
With these steps completed, Elementor Pro is now fully activated on your WordPress site, and you’re ready to explore its extensive range of features and start designing your website with precision and creativity. The focus keyword, ‘How to Install Elementor Pro,’ is naturally integrated into this section, as it guides users through the activation process, a critical part of installing and setting up Elementor Pro effectively.
Exploring Elementor Pro Plugin Features
Now that you’ve successfully activated Elementor Pro on your WordPress site, it’s time to dive into the exciting world of its features. Elementor Pro offers a wide array of tools and functionalities that can take your website design and development to the next level. Let’s explore some of its key features:
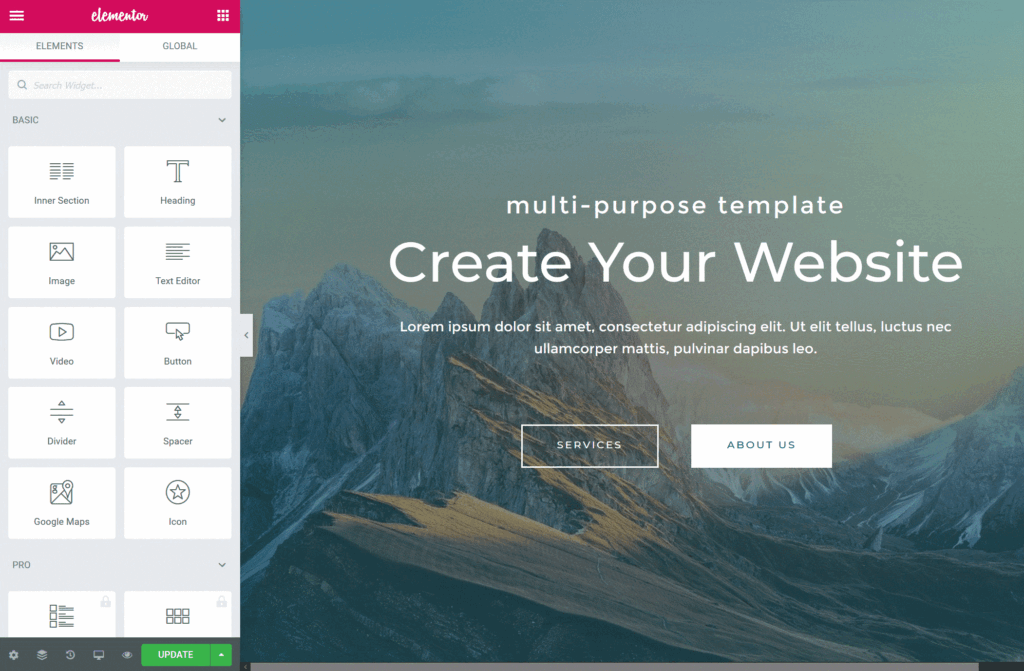
Drag-and-Drop Interface:
- One of the standout features of Elementor Pro is its intuitive drag-and-drop interface. It allows you to design your web pages visually, without any coding knowledge.
- Simply drag elements like text, images, buttons, and widgets onto your page and position them wherever you want. It’s like crafting a web page with building blocks.
Advanced Widgets:
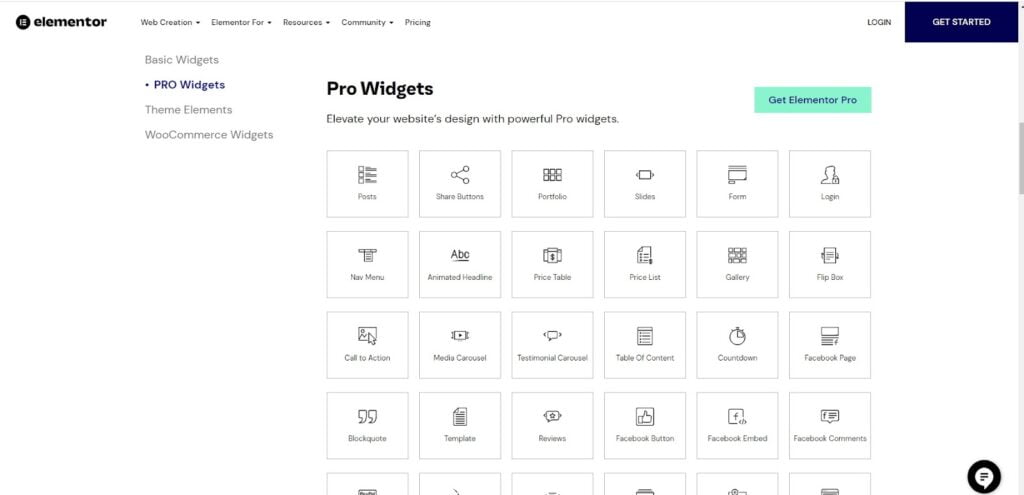
- Elementor Pro plugin comes with a vast library of advanced widgets that extend your design capabilities. These widgets enable you to add elements like forms, sliders, testimonials, and more to your pages.
- Each widget is highly customizable, giving you control over its appearance and behavior. You can fine-tune details like fonts, colors, spacing, and animation effects.
Template Library:
- The Template Library is a treasure trove of pre-designed templates for various page types, including homepages, landing pages, about pages, and contact forms.
- You can import these templates with a single click and then customize them to match your brand and content. It’s a massive time-saver for website creation.
Responsive Design:
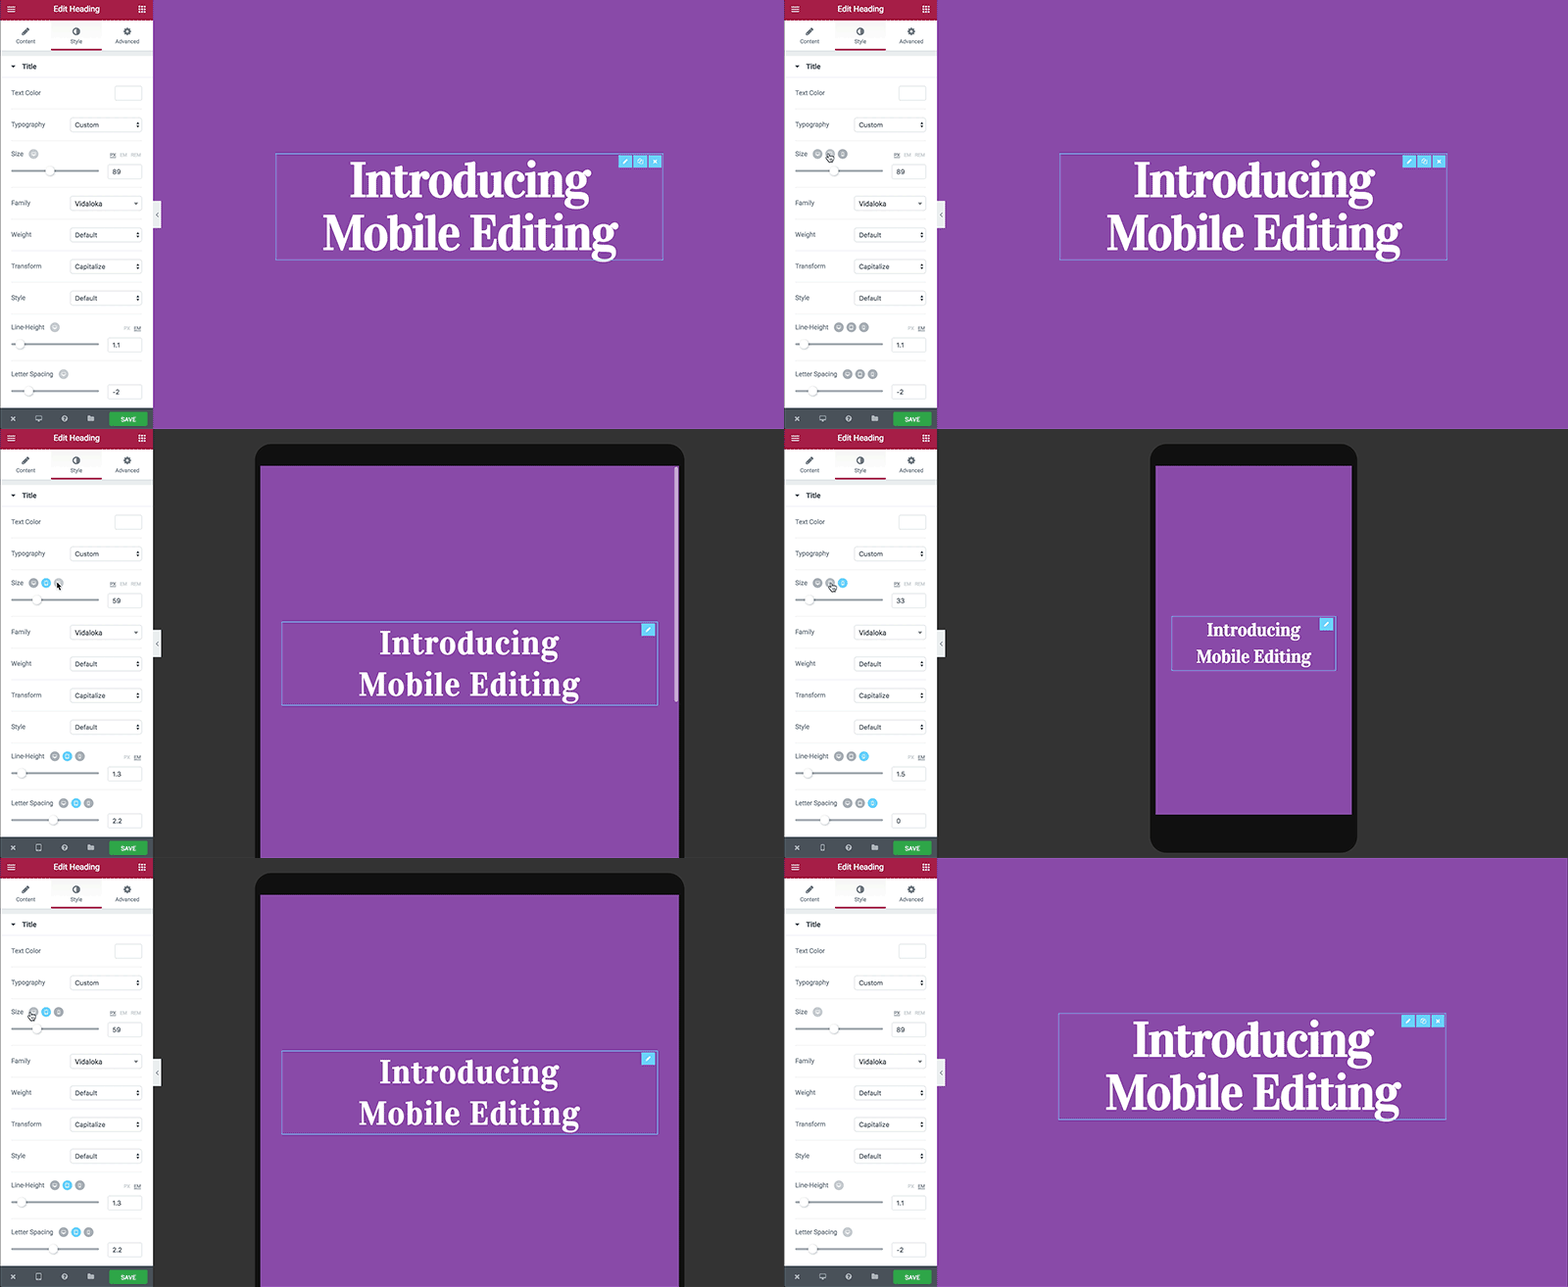
- With Elementor Pro, creating responsive websites is a breeze. You can switch between desktop, tablet, and mobile views to ensure your site looks perfect on all devices.
- Elements and widgets can be individually adjusted for different screen sizes, ensuring a seamless user experience.
Theme Builder:
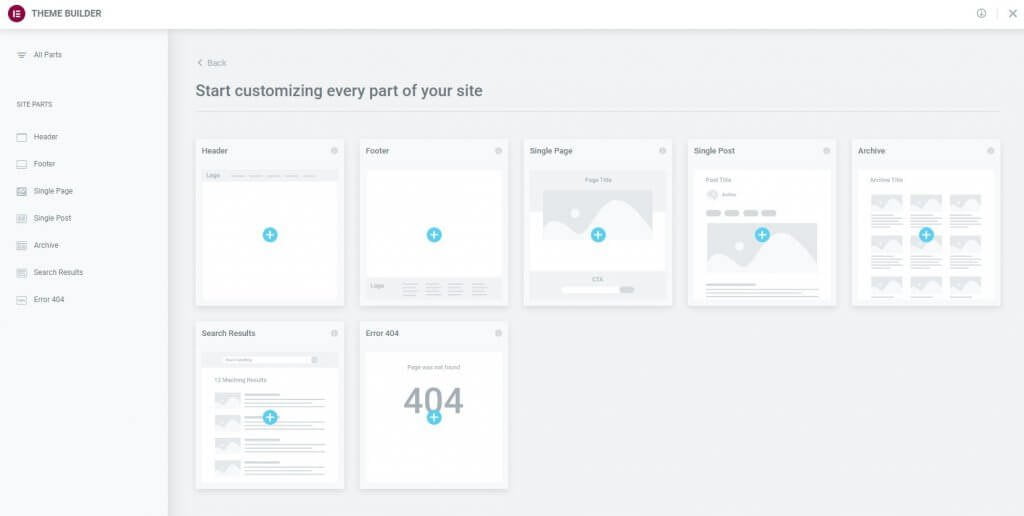
- Elementor Pro’s Theme Builder feature allows you to design every part of your website, including headers, footers, single post layouts, and archive pages.
- You have complete control over the structure and design of your site, making it easy to create a cohesive and unique look.
As you explore these features, you’ll quickly realize the immense potential that Elementor Pro plugin brings to your WordPress site. With its user-friendly interface and powerful design tools, you can create professional and visually stunning websites without the need for complex coding. In the following sections, we’ll delve deeper into using Elementor Pro plugin to create your first page, and we’ll also share some tips for optimizing performance. Stay tuned as we continue our journey of maximizing the benefits of Elementor Pro.
Setting Up Elementor Pro Plugin
Now that you’ve explored the impressive features of Elementor Pro, it’s time to set it up for your specific website needs. Proper setup ensures you make the most of this powerful tool. Follow these steps to configure Elementor Pro for your WordPress site:
Configuring Global Settings:
- Start by navigating to the Elementor settings in your WordPress dashboard. You can find this under the “Elementor” menu.
- In the settings, you’ll find options to configure global settings, such as typography, color schemes, and default widget settings. These settings allow you to establish a consistent look and feel for your website.

Elementor Pro Plugin License Information:
- Ensure your Elementor Pro license information is correctly displayed in the settings. This information confirms that your license is active and up-to-date.
- If for any reason, the license information is not correct, there is usually an option to re-enter your license key to verify it.
User Preferences:
- In the user preferences section, you can customize how Elementor Pro functions for your user account. You can set the default editor mode, enable or disable certain elements, and more.
- These preferences allow you to tailor your Elementor Pro experience to your specific workflow.
Experiments (Optional):
- Elementor often releases new features as experiments. These features may not be stable for all users, but you can choose to enable or disable them based on your preferences.
- If you’re an adventurous user, you can explore these experiments to see if they enhance your website-building process.
By configuring these settings, you’re personalizing Elementor Pro plugin to align with your website’s design requirements and your preferred way of working. This step is crucial in ensuring a smooth and efficient design process as you create and edit your website’s pages.
With Elementor Pro set up to your liking, we’re one step closer to unleashing the full potential of this powerful plugin. In the upcoming section, we’ll guide you through the process of creating your first Elementor Pro page, providing you with practical tips and insights along the way.
Creating Your First Page with Elementor Pro Plugin
Now that Elementor Pro is installed, activated, and set up, it’s time to dive into the exciting part—creating your first stunning web page. Elementor Pro’s intuitive drag-and-drop interface makes this process a breeze. Follow these steps to design your inaugural Elementor Pro page:
Accessing the Page Editor:
- Log in to your WordPress admin dashboard.
- Navigate to “Pages” and click on “Add New” to create a new page or choose an existing page you want to edit with Elementor Pro.
- Click the “Edit with Elementor” button to launch the Elementor Pro page editor.
Choosing a Page Structure:
- When you enter the Elementor Pro editor, you’ll be presented with a blank canvas. You can start from scratch or choose from pre-built page templates.
- If you’re starting fresh, simply drag the elements you need onto the canvas. If you prefer a head start, explore the template library to find a layout that suits your page’s purpose.
Building Your Page:
- Elementor Pro operates on a “What You See Is What You Get” (WYSIWYG) principle. You can design your page by dragging and dropping elements from the sidebar panel onto your canvas.
- Customize each element’s appearance and functionality using the left-hand panel. This includes editing text, adding images, setting backgrounds, and configuring advanced options.
Saving and Publishing:
- As you work on your page, make sure to save your progress regularly using the “Save” button. Elementor Pro also has an autosave feature, but it’s a good practice to manually save your work.
- When you’re satisfied with your page, click the “Publish” button to make it live on your website. You can also choose to save it as a draft or schedule it for publication at a later date.
Preview and Test:
- Before sharing your page with the world, click the “Preview” button to see how it will look to your website visitors.
- Test the page on various devices (desktop, tablet, mobile) to ensure it’s responsive and displays correctly on all screen sizes.
By following these steps, you can create and publish your first Elementor Pro page with ease. The drag-and-drop interface and extensive customization options empower you to design pages that match your vision and brand identity. As you continue to use Elementor Pro, you’ll discover even more advanced features and possibilities for enhancing your website.
In the next section, we’ll provide you with valuable tips for optimizing Elementor Pro’s performance, ensuring your website runs smoothly and efficiently.
Optimizing Performance
After installing, setting up, and creating your first pages with Elementor Pro, it’s crucial to ensure that your website continues to perform optimally. Here are some valuable tips for optimizing the performance of your WordPress site with Elementor Pro in 2023:
Regularly Update Elementor Pro Plugin:
- Elementor Pro developers frequently release updates that not only introduce new features but also improve performance and security. Ensure you regularly update Elementor Pro to the latest version.
- To do this, navigate to the “Plugins” section in your WordPress dashboard, find Elementor Pro, and click the “Update Now” button if an update is available.
Optimize Images:
High-quality images can enhance your website’s visual appeal, but large image files can slow down your site’s loading times. Use image optimization plugins or tools to compress and resize images before uploading them to your site.
Clean Up Unused Elements:
- Over time, you may accumulate unused elements, widgets, or pages in your Elementor Pro projects. Delete or disable elements and pages that are no longer needed to keep your website clutter-free and running smoothly.
Leverage Caching:
- Consider implementing a caching plugin like WP Super Cache or W3 Total Cache. Caching reduces server load and speeds up page load times by storing static versions of your pages.
- Configure the caching plugin to work seamlessly with Elementor Pro for optimal results.
Monitor Plugins and Themes:
- Regularly review and evaluate the plugins and themes you have installed on your site. Deactivate and delete any that are unused or unnecessary, as they can impact your site’s performance.
- Ensure that the themes and plugins you do use are compatible with Elementor Pro and are regularly updated by their developers.
Check for Elementor Pro Specific Updates:
- In addition to updating Elementor Pro, also check for updates related to the theme or plugins specifically designed to work with Elementor. These updates can enhance compatibility and performance.
Optimize Database:
- Use a WordPress database optimization plugin to clean up and optimize your database tables. A well-optimized database can lead to faster page loading times.
Consider Content Delivery Networks (CDNs):
- CDNs distribute your website’s content across multiple servers around the world, reducing the load on your hosting server and improving page load times for visitors from different geographical locations.
Monitor Performance Metrics:
- Utilize performance monitoring tools such as Google PageSpeed Insights, GTmetrix, or Pingdom to regularly check your website’s speed and performance. These tools provide insights and recommendations for further improvements.
By following these performance optimization tips, you can ensure that your WordPress website, powered by Elementor Pro, delivers a fast and responsive user experience. Regularly maintaining and optimizing your site is key to keeping it running smoothly and efficiently.
In summary, Elementor Pro is a powerful tool that can significantly enhance your website’s design and functionality. By combining the knowledge from this guide with continuous performance optimization, you’ll be well-equipped to create and maintain a top-notch WordPress site in 2023.
Troubleshooting Common Issues
While Elementor Pro is a powerful tool, like any software, it can sometimes encounter issues. Here, we’ll address common problems users might encounter during or after the installation and setup process, along with solutions to troubleshoot them:
Blank White Screen (White Screen of Death):
Issue: After installing or activating Elementor Pro, you may encounter a white screen on your WordPress site, making it inaccessible.
Solution:
- Disable Elementor Pro: If you can access the WordPress admin, go to the plugins section and deactivate Elementor Pro. This might resolve the issue temporarily.
- Check for Plugin Conflicts: Reactivate Elementor Pro and deactivate other plugins one by one to identify if there’s a conflict. Sometimes, two plugins may not play well together.
- Increase PHP Memory: If the issue persists, try increasing your PHP memory limit by adding the following code to your wp-config.php file:

Editor Not Loading or Stuck on Loading:
Issue: When trying to edit a page with Elementor Pro, the editor may not load or get stuck on the loading screen.
Solution:
- Clear Browser Cache: First, try clearing your browser cache and cookies. Sometimes, a cached version of the editor can cause issues.
- Check Internet Connection: Ensure you have a stable internet connection. Slow or intermittent internet can affect Elementor’s functionality.
- Disable Third-Party Extensions: Browser extensions or add-ons can sometimes interfere with Elementor. Try disabling them and see if the editor loads properly.
Elementor Widgets Not Displaying Correctly:
Issue: Widgets added with Elementor Pro may not display as expected, or their styling may appear broken.
Solution:
- Check Theme Compatibility: Ensure that your WordPress theme is fully compatible with Elementor Pro. Some themes may require additional adjustments for optimal compatibility.
- Review Custom CSS: If you’ve added custom CSS code, check it for errors that might be affecting the appearance of Elementor widgets.
- Update Elementor: Make sure you’re using the latest version of Elementor Pro, as updates often include bug fixes and improvements.
Slow Loading Times:
Issue: Your site’s pages created with Elementor Pro may load slowly.
Solution:
- Image Optimization: Optimize your images and use appropriate file formats (JPEG, PNG, etc.) to reduce loading times.
- Enable Caching: Utilize a caching plugin to store static versions of your pages, reducing server load and improving load times.
- Consider a Content Delivery Network (CDN): Implementing a CDN can distribute your content across multiple servers globally, improving loading speeds for visitors from different locations.
Elementor Pro Plugin License Key Issues:
Issue: You might encounter problems with your Elementor Pro Plugin license key, such as it not being accepted during activation.
Solution:
- Verify License: Double-check that you’ve entered the correct license key, ensuring there are no typos or extra spaces.
- License Usage Limit: Ensure you’re not exceeding the number of allowed installations based on your license type (e.g., personal, business, agency).
- Contact Support: If the issue persists, reach out to Elementor Pro’s customer support for assistance.
WordPress Compatibility Issues:
Issue: Compatibility problems may arise if your WordPress version is outdated or not compatible with the latest Elementor Pro release.
Solution:
- Update WordPress: Ensure your WordPress installation is up to date by regularly updating to the latest version.
- Elementor Pro Compatibility: Check the Elementor Pro documentation for compatibility information with specific WordPress versions. Update Elementor Pro accordingly.
By addressing these common issues and their solutions, you can troubleshoot and resolve potential roadblocks that may arise during your Elementor Pro journey. Keeping your Elementor Pro installation well-maintained and up-to-date is key to ensuring a smooth and trouble-free experience.
Keeping Elementor Pro Plugin Updated
Ensuring that your Elementor Pro installation stays up to date is a critical aspect of maintaining a secure and efficient WordPress website. Here’s how to keep Elementor Pro updated:
Regularly Check for Updates:
Elementor Pro developers release updates to enhance performance, add new features, and address security concerns. To check for updates:
- In your WordPress dashboard, navigate to the “Plugins” section.
- Locate Elementor Pro in the list of installed plugins and look for an update notification.
Update Elementor Pro Plugin:
- If an update is available, click the “Update Now” button to initiate the update process. WordPress will automatically download and install the latest version of Elementor Pro.
- It’s recommended to make a backup of your website before updating, just in case anything goes wrong during the process. Many backup plugins are available for this purpose.
Check Elementor Theme Compatibility:
- In addition to updating Elementor Pro, ensure that your WordPress theme is compatible with the latest version of Elementor Pro. Some themes may require updates or adjustments for optimal compatibility.
- Contact your theme’s developer or check their documentation for information on Elementor Pro compatibility.
Verify Elementor Pro Plugin Functionality:
- After updating Elementor Pro, thoroughly test your website to ensure that all its features and functionalities work as expected. Pay attention to elements and widgets created with Elementor Pro to ensure they display correctly.
Set Up Automatic Updates (Optional):
- You can configure your WordPress site to automatically install minor updates for plugins like Elementor Pro. However, it’s advisable to handle major updates manually to ensure compatibility with your site.
- To enable automatic updates for Elementor Pro, you can use plugins like “Easy Updates Manager” or add custom code to your site’s functions.php file. Be cautious when making changes to your site’s code and consider consulting with a developer.
By keeping Elementor Pro updated, you not only benefit from the latest features and improvements but also ensure that your website remains secure and optimized for performance. Regularly checking for updates and following the update process is a crucial part of maintaining a well-functioning WordPress site.
In the concluding section of this guide, we’ll summarize the key takeaways and provide additional resources to help you make the most of Elementor Pro in 2023.
Our Recommendations
When it comes to creating a powerful and visually appealing WordPress website, the combination of Elementor Pro with a compatible theme is a winning formula. While there are many themes to choose from, we recommend considering Elementor Pro in conjunction with either Astra Pro or OceanWP Premium. Here’s why:
1. Astra Pro – Seamless Integration with Elementor Pro Plugin:
- Perfect Compatibility: Astra Pro is known for its exceptional compatibility with Elementor Pro Plugin. The two work together seamlessly, allowing you to create and customize your website effortlessly.
- Lightweight and Fast: Astra is renowned for its lightweight design and quick loading times. When paired with Elementor Pro’s design capabilities, you get both speed and versatility.
- Pre-built Starter Sites: Astra Pro offers a library of professionally designed starter sites that you can import with a few clicks. These sites serve as an excellent starting point for your web design project and can be customized with Elementor Pro Plugin.
- Enhanced WooCommerce Integration: If you plan to build an online store, Astra Pro offers enhanced WooCommerce compatibility, making it an ideal choice for e-commerce websites.
2. OceanWP Premium – Extensive Customization Options:
- Advanced Customization: OceanWP Premium provides a wide range of customization options that complement the Elementor Pro plugin’s design capabilities. From header styles to layout options, you have full control over your website’s appearance.
- WooCommerce Integration: OceanWP Premium offers deep integration with WooCommerce, making it a powerful choice for e-commerce sites. You can design product pages and online stores with precision using Elementor Pro.
- Full Accessibility: OceanWP Premium places a strong emphasis on accessibility, ensuring that your website is inclusive and user-friendly for all visitors, a crucial factor for modern websites.
- One-Click Import: OceanWP Premium includes a library of demo sites that can be imported with a single click. This feature expedites the website creation process and allows for easy customization using Elementor Pro.

Elementor Pro
Essential Plan: Ideal for single-site owners or bloggers. 1 Pro Website.
Expert Plan: Suited for small businesses managing multiple websites. 25 Pro Websites.
Agency Plan: Designed for web design agencies and developers handling client sites. 1000 Pro Websites.

ASTRA PRO
Advanced Customization.
Extensive typography and color controls.
Seamless WooCommerce integration.
Lightning-fast performance and SEO optimization.
Custom layout options for posts and pages.
Enhanced site layout settings.
Dedicated support and regular updates.
Integration with popular page builders like Elementor and Beaver Builder.

OceanWP PREMIUM
Full Customization
E-Commerce Integration
Performance Optimization
SEO-Friendly & Super Responsive
Premium Extensions
Choosing the Elementor Pro plugin in combination with Astra Pro or OceanWP Premium simplifies the web design process and provides you with a feature-rich, customizable, and fast-loading website. The decision between Astra Pro and OceanWP Premium ultimately depends on your specific needs and design preferences.
Astra Pro offers a lightweight and compatible foundation for those who prioritize speed, while OceanWP Premium provides extensive customization options and accessibility features for those seeking full creative control.
Ultimately, both combinations offer excellent value and compatibility with Elementor Pro, ensuring that your WordPress website in 2023 will be both stunning and functional.
However, you can explore the step-by-step guide on How to Install and Activate Astra Theme in 2023 before using Astra.
Conclusion
Congratulations! You’ve completed our comprehensive step-by-step guide on how to install and set up Elementor Pro plugin in 2023, unlocking a world of creative possibilities for your WordPress website. In this guide, we’ve covered every essential aspect of working with Elementor Pro plugin, from its initial installation to troubleshooting common issues, ensuring you’re well-prepared to harness the full potential of this powerful plugin.
Key Takeaways of How to Install and Set up Elementor Pro:
- Purchasing Elementor Pro Plugin: We began by explaining the importance of obtaining a legitimate copy of Elementor Pro to access its premium features and support.
- Downloading Elementor Pro Plugin: You learned how to download the Elementor Pro plugin files securely from the official Elementor website.
- Installing Elementor Pro Plugin: Our step-by-step installation guide ensures that you successfully install and activate Elementor Pro on your WordPress site.
- Activating Elementor Pro Plugin: We walked you through the activation process, including configuring settings and connecting your Elementor account.
- Exploring Elementor Pro Plugin Features: You discovered the vast array of features Elementor Pro offers, empowering you to design visually stunning and highly functional web pages.
- Setting Up Elementor Pro: We highlighted the importance of configuring Elementor Pro’s settings to match your website’s design requirements and workflow preferences.
- Creating Your First Page with Elementor Pro: Our guide assisted you in designing your inaugural Elementor Pro page using its intuitive drag-and-drop interface.
- Optimizing Performance: You gained insights into optimizing your website’s performance, ensuring fast loading times and smooth user experiences.
- Troubleshooting Common Issues: We addressed common problems and provided solutions to ensure you can tackle any challenges that may arise.
- Keeping Elementor Pro Plugin Updated: We stressed the importance of regularly updating the Elementor Pro plugin to benefit from enhancements and maintain site security.
As you continue to work with Elementor Pro plugin, remember that practice makes perfect. Don’t hesitate to experiment, explore, and push the boundaries of your website design. Additionally, stay engaged with the Elementor Pro community, where you can find valuable insights, tips, and resources.
In 2023 and beyond, Elementor Pro plugin remains an invaluable tool for WordPress website creators, offering limitless opportunities to turn your ideas into reality. We hope this guide has been a valuable resource on your journey to mastering Elementor Pro and enhancing your WordPress site.
If you have any further questions or need assistance, the Elementor Pro support team is readily available to help you. We wish you all the best in your website design endeavors with Elementor Pro!
Thank you for choosing to explore ‘How to Install Elementor Pro’ with us. Happy designing!
Additional Resources and Support
Beyond this comprehensive guide, there are valuable resources and avenues of support that can further enhance your journey with Elementor Pro in 2023:
Elementor Pro Plugin Documentation:
- The official Elementor website offers extensive documentation that covers a wide range of topics, from basic setup to advanced features. It’s a go-to resource for finding detailed explanations, tutorials, and troubleshooting guides.
- Explore the documentation: Elementor Pro Documentation
Elementor Community:
- Engage with the Elementor community through forums and social media groups. It’s an excellent place to seek advice, share experiences, and learn from fellow Elementor users.
- Join the Elementor Community: Elementor Community
Elementor YouTube Channel:
- Elementor maintains an official YouTube channel with video tutorials and webinars covering various aspects of using Elementor Pro. These visual resources can be especially helpful for visual learners.
- Subscribe to the Elementor YouTube Channel: Elementor YouTube Channel
Support from Elementor Pro Team:
- If you encounter technical issues or have questions specific to your Elementor Pro usage, don’t hesitate to reach out to Elementor Pro’s customer support. They are responsive and knowledgeable, providing assistance to ensure your Elementor Pro experience is smooth and efficient.
- Contact Elementor Pro Support: Elementor Support
Elementor Pro Blog:
- Stay updated with the latest news, tips, and best practices related to Elementor Pro by following the official Elementor Pro blog. It’s a valuable resource for staying informed about the latest trends and developments in web design.
- Read the Elementor Pro Blog: Elementor Blog
Online Courses and Tutorials:
- Consider enrolling in online courses or tutorials offered by educators and professionals who specialize in Elementor Pro. These courses can provide in-depth insights and hands-on guidance for mastering Elementor Pro.
- Search for Elementor Pro courses on popular e-learning platforms.
These additional resources and support options are invaluable as you continue to explore and expand your skills with Elementor Pro. Whether you’re a beginner or an experienced web designer, there’s always more to discover and achieve with this versatile WordPress plugin.
We hope this guide has equipped you with the knowledge and confidence to leverage Elementor Pro to its fullest potential in 2023 and beyond. Thank you for joining us on this journey of learning ‘How to Install Elementor Pro’ and creating exceptional WordPress websites.
Comments and Feedback
Your feedback and comments are essential not only for us but also for the Elementor Pro community. Here’s how you can contribute and benefit from this interactive ecosystem:
Share Your Experience:
- If you found this comprehensive guide on ‘How to Install Elementor Pro’ helpful, consider sharing your experience in the comments section. Your insights and feedback can assist fellow users who may be exploring Elementor Pro for the first time.
Ask Questions:
- If you have any questions or encounter challenges related to Elementor Pro installation, setup, or usage, feel free to ask in the comments. Our community, as well as our team, is here to help address your queries.
Offer Solutions:
- If you’ve successfully resolved an issue or found an innovative way to use Elementor Pro, consider sharing your solutions and tips in the comments. Your contributions can benefit others facing similar challenges.
Engage in Discussions:
- Engage in discussions and conversations within the comments section. Sharing your insights and opinions can spark valuable dialogues and expand everyone’s understanding of Elementor Pro.
Stay Informed:
- Keep an eye on the comments section for updates, additional tips, and responses from the Elementor Pro community. It’s a dynamic space where you can learn and grow together.
Constructive Feedback:
- If you have constructive feedback about the guide or suggestions for future content related to Elementor Pro, please share them. Your input helps us improve our resources and tailor them to your needs.
Connect with Fellow Enthusiasts:
- Use the comments section as an opportunity to connect with fellow Elementor Pro enthusiasts. Networking with others who share your interests can lead to collaborations and valuable insights.
We value your participation and encourage you to be an active part of our community. Your comments and feedback contribute to the collective knowledge and help make Elementor Pro even more accessible and user-friendly.
Thank you for being part of this vibrant community of web designers and developers using Elementor Pro to create outstanding WordPress websites in 2023.
FAQs
Q1: What is Elementor Pro, and why should I install it?
Elementor Pro is a premium WordPress page builder plugin known for its drag-and-drop interface and advanced design capabilities. You should install it to create visually stunning and highly functional web pages without the need for coding skills.
Q2: Can I use Elementor Pro Plugin on any WordPress theme?
Yes, the Elementor Pro plugin is compatible with most WordPress themes. However, for the best experience, it’s recommended to use a theme that explicitly supports Elementor Pro plugin or one that is highly customizable.
Q3: What’s the difference between the free version of Elementor and Elementor Pro Plugin?
Elementor Pro plugin offers advanced features like theme building, WooCommerce integration, dynamic content, and premium widgets, which are not available in the free version. Elementor Pro provides more flexibility and functionality for professional website design.
Q4: Where can I purchase Elementor Pro Plugin?
You can purchase Elementor Pro plugin directly from the official Elementor website. They offer different licensing options, including personal, business, and agency plans, depending on your needs.
Q5: Is it necessary to have coding knowledge to use Elementor Pro Plugin?
No, Elementor Pro is designed for users with little to no coding experience. Its intuitive drag-and-drop interface allows you to design web pages visually, eliminating the need for coding.
Q6: How do I install Elementor Pro Plugin on my WordPress site?
To install Elementor Pro, first, purchase a license, and then follow our step-by-step guide in this article for detailed instructions on installation and activation.
Q7: Is Elementor Pro Plugin compatible with the latest version of WordPress?
Yes, Elementor Pro is regularly updated to ensure compatibility with the latest WordPress versions. It’s essential to keep both WordPress and Elementor Pro up to date for optimal performance.
Q8: Can I use Elementor Pro Plugin on multiple websites with a single license?
The number of websites you can use the Elementor Pro plugin on depends on the type of license you purchase. Personal licenses typically allow for one site, while business and agency licenses offer multiple site usage.
Q9: What should I do if I encounter issues during or after the installation of the Elementor Pro Plugin?
If you encounter issues, refer to our troubleshooting section in this guide. You can also seek assistance from Elementor Pro’s customer support, who are experienced in resolving technical problems.
Q10: Do I need to be a web design expert to use the Elementor Pro Plugin effectively?
While web design experience can be helpful, the Elementor Pro plugin’s user-friendly interface makes it accessible to users of all skill levels. With practice and the resources available, you can become proficient in using the Elementor Pro plugin for website design.


